Saturday, September 24, 2011

A paper bag book

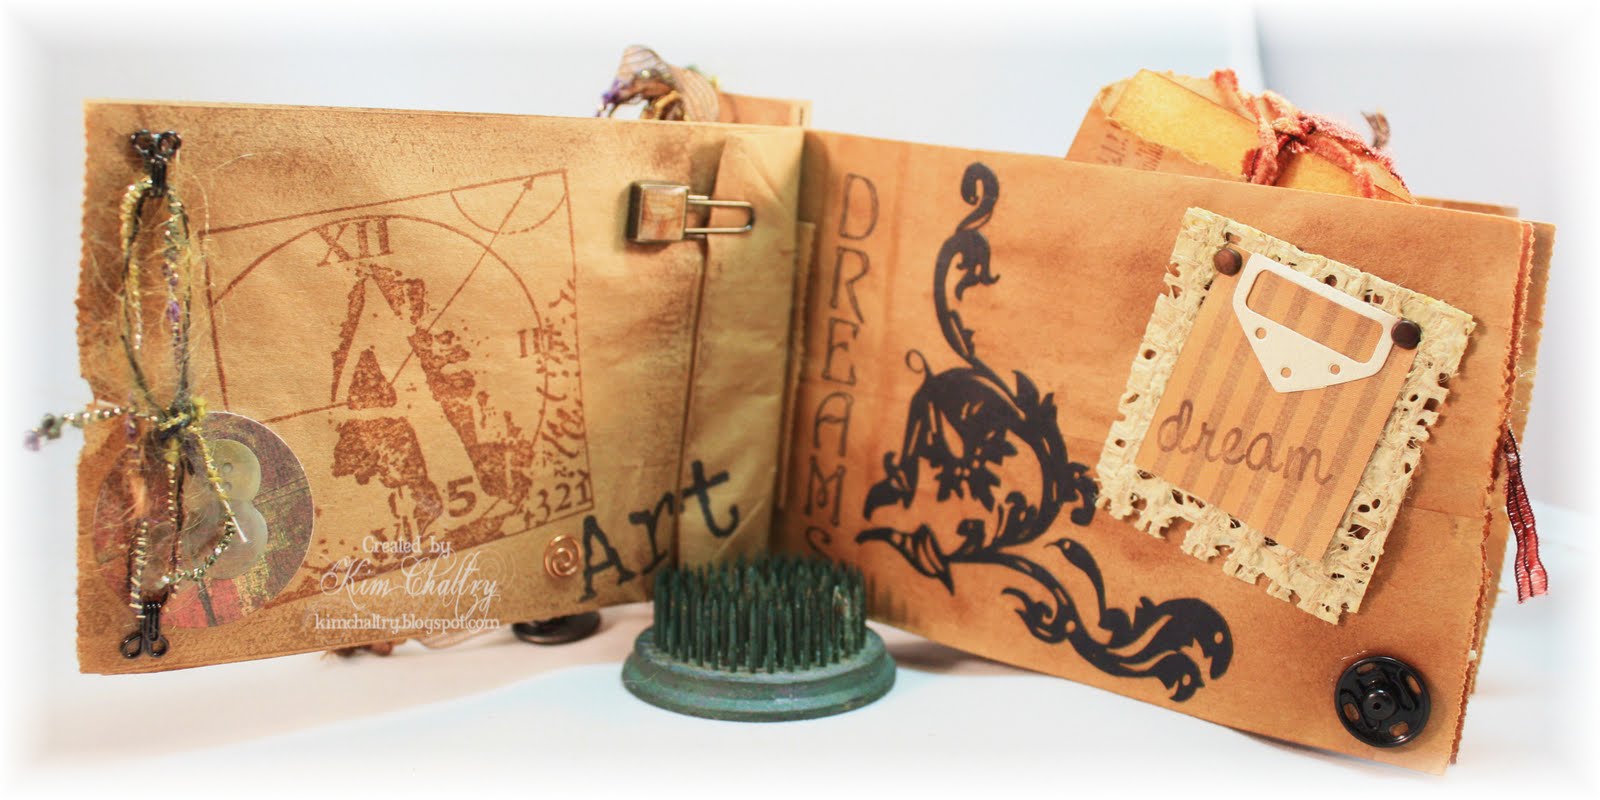
Today I wanted to share with you a paper bag book that I recently taught at our stamp club. I thought the sentiment on the front was very fitting for the theme of the book. It was my imagination that filled the pages inside. The paper bags are sandwiched between two pieces of ruler with bolts.

For this book you need a yardstick or ruler, 5 small paper bags, 1/2" long bolts and nuts. If you purchase a ruler, try to get the ones without the metal edge. I had a difficult time finding yard sticks that didn't have the store's logo printed on it. This is a book that I made awhile back and I had an old yardstick laying around the house that was logo free. The paper bags that I used are 5 1/2" x 3"-the tiny size that would hold penny candy (remember those days of penny candy). You can probably find these on line. I purchased mine from a local supply store that has all kinds of products for businesses.

I cut the yard stick to 4" and drilled the holes about 6/8" from each end- you will need two of them. I then punched holes in my bags 1/2 inch from each side. Notice the yard stick is slightly longer than the bags. You might want to lay one of the rulers that has already been cut and drilled on to one of the bags and then mark where the holes should be punched. Just make sure you are an even distance from the top and bottom of the bag. I stamped and embellished the pages prior to putting the book together.

I sponged ink onto some of the pages and on others I used some acrylic metallic paint. I didn't cover the pages with any printed paper because I wanted the paper bag color to be clearly visible and the main visual of the book. After all it is a paper bag book. Take a look below and make your book your own creation. You can click on any of the images below to get a closer look at the pages.


I hope you enjoyed today's idea. I've got some straitening up to do in my studio (some new goodies need a place to call home) and I still want to get the living room carpet cleaned. Just where does the day go?


~Have fun and enjoy!


Sunday, September 18, 2011

Plastic wrap and a dab of paint...


Just plain plastic wrap and a bit of metallic paint is what I used to create a background for this card. Glossy card stock works the best for this technique. If you click on the image below you can get a better view. I crinkled up a wad of plastic wrap and then lightly tapped it into a small amount of pearl and light gold metallic ink that I put on a paper plate. I then tapped it "off" onto the plate before I stamped it lightly onto the card. I sort of bounced it here and there around on the card stock.

The black medallion is from Stampin' Up and is one of my favorite background stamps. I put some dabs of gold Liquid Pearls on the medallion. I used two of Martha's border punches at the bottom. Some ribbon, a flower and a few rhinestones gave this card a finishing touch.


I have been in an organization mode since my mind has been toying with moving into the bonus room up over the 3 car garage. Right now it is my son Elliot's room, but he is hardly ever there. He is away at college but stayed this past summer to work. I have a feeling there was more having fun than working, but that is the life of a 22 year old. The rent was cheaper during the school months if he signed a 12 month lease. So as he says "it is like the rent was free". I don't think he has heard the old adage- nothing is free. This boy has a lot to learn. Anyway I don't want to move my studio up there until he finishes college and gets his own apartment- just in case! We'll see how things go.

Not a whole lot to talk about today. Summer is coming to a close and the nights are getting much cooler. The DH is having brain surgery next month to remove a meningioma that is getting quite large. It was an incidental finding on the Cat Scans and MRI he had 6 years ago when he had his stroke. It has really started to grow this year and the neurosurgeon said it is time to take it out. I was getting concerned about his increasing deficit on the left side and this meningioma seems to be causing it. I'm not looking forward to this and I am sure he feels the same way. The good news is that we bought an iPad2 so I will have something to entertain myself while he is in the hospital. That thing is truly awesome. I am blown away by what this thin tablet can do. I love the face to face video chat (as long as I look half way decent and my hair is combed). We just got it today so we have a few things to learn.


~Have fun and enjoy!


Saturday, September 10, 2011

All because of an extra coupon...


It all started with a 40% coupon. I mentioned to the DH that I had an extra coupon to Hobby Lobby if he wanted it. We were out shopping that night and he said alright that he would be my "coupon mule". That is his term for being used to get an extra item with a coupon. Any way, I had to return some candles and while I was in line waiting, he asked me if I wanted him to use his coupon on a Spellbinders Grand Callibur. I about fell over. He said he might as well buy it now for my birthday (which is in November) while he had the coupon and then his shopping for a gift would be done. I ran as fast as I could to the Spellbinders isle and there at the end of the isle that beautiful pink machine was saying "I'm all yours". Not much courting or yearning with this one. I had only recently mentioned how much I liked my friend's and said I wouldn't mind getting one for my birthday. I think DH has forgotten that I have already received my birthday gifts well into 2025 at least. Oh well who am I to remind him of his absentmindedness. The dies just happened to be 40% off that night so he also had me pick out one. Silly me said he is going to have to put it away since my birthday isn't until November. He said he would hide it in my stamping room. He isn't good at hiding because you can see I already made a card with it.

Next Friday is my daughter's wedding anniversary and since I am sending a box I thought I would make a card that doesn't have to fit the parameters of being sent through the mail. I used the largest Grand Label 4 and then the next size down for the DS paper. The burgundy rosettes were made with the Bigz Sizzix Flower 3-D die. I just love that die and I can see me getting a lot of use out of this one. The cream flower is Prima and the butterfly was punched with a MS punch on vellum. I then added some stickles to the edges of the wings. The ribbon is actually a closer match to burgundy than what shows in the picture. It isn't really that red. The sentiment is from SU as are the punches.


I will be teaching our stamping club members how to make a book with small paper bags. They are the really small ones that would be used to hold penny candy. The spine is two pieces of a ruler and 2 bolts go through to hold it altogether. I better get cutting. I have sixty 4" pieces to cut and then drill two holes through each piece- yikes!


~Have fun and enjoy!


Monday, September 5, 2011

Tags

I hope you all had a relaxing Labor Day. Now that I type that it seems rather conflicting doesn't it? Anyway I hope you enjoyed it. I did a little stamping, made some banana bread and then went out to lunch and shopping with some stamping buddies. Best day ever because we had 50% & 40% coupons.

Today's card was very simple. The only stamping was the sentiment. That's right and the sentiment is a dollar stamp. Everything else was embellishments. The tag was from the $1 bin at JoAnns by Studio 112. There are 24 tags with 12 different designs. Such an easy way to dress up a card. The designer paper is from the DCWV Mariposa stack. The cream flowers are bridal confetti from Michaels and they come in a few different colors. It is amazing the embellishments you can find in the bridal isle. You will need to share them because there are over 100 in a package.


I have been busy changing the color in our bedroom. I went from gold/burnt orange and dark olive to robins egg blue and chocolate. I am surprised the DH went for it. He couldn't quite figure out the Euro pillows and then sham pillows over our sleeping pillows. Along with the two small decorative pillows there are 8 pillows on the bed. Plan on going to bed 15 minutes earlier than planned by the time you are able to find the sheets. Oh well I told him it is a good workout and the bedroom looks fabulous. Just remember to fold the comforter back before you crawl in. How he lives with my craziness I will never know.


~Have fun and enjoy!