Saturday, February 18, 2012

Elegant Frame


I hope everyone had a wonderful Valentines day. I came home from work to roses and "Skinny Cow" chocolates. Those little morsels are pieces from heaven. Oh, the roses were beautiful also.

As I was sitting in my studio savoring my chocolates, I looked around I came to the conclusion that if I was fortunate enough to have such a beautiful space, I should be creating better projects. So here it is. I spent a bit more time on this card than I normally do and it shows. I was getting tired of my cards looking the same. An image, a bow and some bling weren't cutting it anymore. Not to say I won't go back to that style, but I knew I needed to punch it up a bit to keep my creativity alive. You can click on the picture to enlarge it and there is a close up picture of the flowers below.

This card creates a frame around the image. I used the SU stamp set Organic Grace and stamped it in SU Certainly Celery and Vintage Violet (disc. color). This was mounted to the smallest die in the Spellbinders Grand Label Four. I then used a MS Deco Fan corner and edge punch on a 3.25" x 5" piece of white card stock. Using the Spellbinders Label Four, I created a window in the white card stock and also on a piece of SU Wisteria Wonder. These two pieces were mounted over the image with pop dots to create the frame.

The flowers were created with EK Success Daisy punch and a SU three flower punch from a kit that was called Punch Artwork. They no longer carry it but there are several other small flower punches like it. I punched two larger and one smaller Daisy and one use just one of the flowers from the SU punch. In the picture below you can see the single leftover flowers I used as fillers. I alternated SU Almost Amethyst and Wisteria Wonder for more depth to the flower and then added a pearl. **Here is a tip for you- When you are trying to get a pearl in the center of your flower without having the hole end up on top, I put my pearl bead on a needle or something pointed and then just lay it down. This way the holes will always be on the sides where you wont see them.

The leaves were created out of SU Certainly Celery and River Rock using MS Branches Fir and Spellbinders On the Vine Border die. I used an embossing tool to crease in the lines on the leaves. You don't need the exact same punches as I used, and the layers don't need to be the same style. Just make sure the sizes gradually decrease.


I brought this card and few more that you will be seeing over the next few posts into work the other day. The Cardiologist that works in my department asked me how long it took me to make this card. I told him it probably took me an hour but most of that was thinking what I wanted to use. He said he was going to ask me to make him 200 cards. I hope he didn't think they would all be like this. I know his daughter is getting married in August and if he wants me to make 200 of anything he better ask fast.

~Have fun and enjoy!


Saturday, February 11, 2012

Happy Valentines Day


Happy Valentines Day! I call this a perfect holiday because it includes chocolate and love. I still do treat myself to a bit of chocolate every now and then. The sugar free is ok but nothing like the real thing. I made my cards and sent boxes out to the kids. I sent my daughter a bag of Michigan Cherry coffee and when the package was all taped up it still smelt so strong of the lovely aroma. The postal service is going to love me.
I am still making an effort to create cards with new items that I haven't used yet. This stamp is from KaiserCraft called Lady Jude. She has been sitting on the shelf for quite some time now and it was time to give her a try. I love her vintage look but I wasn't quite happy with the amount of black the stamp creates. I guess the way to get around it would be to use markers and outline her hands and face with black and the dress with the color of choice. I might try that next time. I colored her with RV 17 Copic marker to match the SU Melon Mambo card stock that I embossed with Tim Holtz's Regal Flourish embossing folder. The diamond designer paper is the Laundry Line from My Minds Eye and the floral is from Prima's Madeline. I used the sentiment stamp from SU's Clearly for You stamp set and punched it out with the SU Curley Label punch. I colored the pearls with the same RV 17 Copic marker. I thought I would try something different with my bow so I didn't include any tails. I just left the tails long and wrapped them around the back of the card.

If you have this stamp, don't give up on her. I certainly love her too much to do that to her. Sometimes we just need to play around with something before we get it right. Always try to use your stamps with a different technique if you don't like the way it turned out the first time. You never know, you might have given up on a beautiful stamp before trying it again.


It is cold and snowy here in Michigan. I think it is a good day to stay in my PJs and make a big batch of chili. I had the most perfect morning today. I sat at the kitchen island in the quiet and stillness of early morning with a candle burning, a good cup of flavored coffee and my iPad. I could see the snow blowing over the back yard and hear the wind howling every now and then. It was rather cozy, but I had a hard time keeping my mind from imagining myself basking in the Florida sun. I have to learn how to enjoy things as they really are. There is always something good in the moment even if it is 20 degrees and 5 inches of new snow. I know my friend Carol is probably having a hard time believing that now that she is in 80 degree weather. Keep laughing Carol, Port Huron misses you.

~Have fun and enjoy!

Thursday, February 2, 2012

Using something new

I wanted to thank all of you for the lovely comments about my new room. I hope you can take away a few ideas for your own stamping space. I must have looked at 100 or more pictures before I knew what I wanted, so in giving back, I shared my space with all of you.

For today's card, my assignment was to use some products that I have had for awhile but were still sitting on the shelf. I used some of my favorite card stock which is from Stampin' Up. I like it's thickness but mostly I love their colors. This card was made with Crumb Cake, Always Artichoke, Cherry Cobbler, Cream and a tiny piece of Old Olive. The artichoke panel was embossed with the "Branches with Leaves" folder from Sizzix and the cherry cobbler shape is embossed with Tim Holtz's "Regal Flourish" folder and then die cut with Label 20 from Spellbinder's . The branches were sanded lightly for texture and dimension. I was actually surprised with myself that I haven't used this stamp set before now, because it was one I yearned over for along time. It is Established Elegance from Stampin' Up. There are 10 luscious stamps in this set and I had to hold myself back from trying to use all of them on this one card. The dress form and other designs were stamped on a cream panel and then embossed with one of the Textured Impression Embossing Folder called Designer Frames from Stampin' Up. I cut out around the embossed edge which created a cute frame and then rubbed some Antique Linen Distress ink on the edges. The rhinestones are a pretty champagne color that are from Michaels.

Wow, so we are into February already. Valentine's Day is just around the corner so I better start thinking of something lovey dovey to make. I will have to sit and think about that one. Trying to come up with something different for 26 years, gets challenging.

I hope all of you are getting through the winter blahs. So far we have been pretty lucky with our weather. I think we have only had snow on the ground for 3 days at the longest and then it melts. We have had more rain than snow, and for Michigan that is unheard of.

~Have fun and enjoy!

Sunday, January 22, 2012

New Stamp Studio


This is the pride and joy of my new studio. I have always wanted a chandelier but the DH wasn't too thrilled to have one over the tub. I have now found the perfect place for it, right over my stamping desk.


As you can probably gather, I have taken on a Paris theme to my new space. Most of the items have been gifts to make it such a special room of love and kindness. The dress form was a gift to myself.


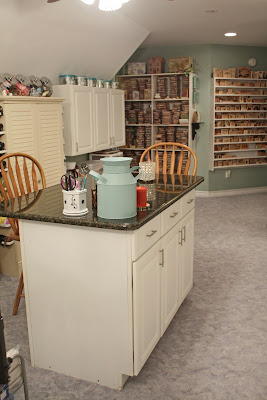
The room is very long. It is the bonus room up over the three car garage and measures 11' x 30'. It didn't take long before it started to feel small. The white cabinets were a great find on Craig's list including the island. I still need to patch a few nail and screw holes. I also want to add some more trim to fancy up the island.


It was difficult to use all the cabinets because the side walls were so short due to the angle of the ceiling. The guys who put up these side cabinets, called them my "Snookey" cabinets. They are rather low but I really like the extra storage. The table below them can be pulled out and raised if needed. I have my photo tent underneath the table and it sits on the floor. I just raise the skirt and it is all set up with the lights. One flip of a switch and all the lights are on. The table made a perfect place for my coffee maker and 100 calorie treats.


This is a close up of the island and my desk is just beyond it. I had the granite made a little longer on the end so that an extra friend would have a place to stamp.


This shelf was such a find. It was being thrown out at the hospital and since I now all of the maintenance guys, they were happy to load it into my car rather then the dumpster. A new coat of spray paint and I have a beautiful treasure for my favorite wood stamps.


This is where all of my wood stamp sets are stored. A majority of them are Stampin' Up but the others are categorized and stored in extra cases from Stampin' Up. Of course they are stored by category- sentiments, words, flowers, tags, holidays ect.

I put up a curtain and took down the closet door because the door opened in and it took up too much of my storage space. It isn't a very big closet but I was able to get two tall book cases in there as well as a shelf. It has a nice bright light so it is very easy to find things.


This is how I store some of my punches. The edge and matching corner punches are on the shelf along the other side of the room.


This cabinet is where all of my designer paper is. The single sheets are stored by color in the stand up paper holders. The packs of paper are stored by theme and manufacturer.


This cubicle unit is several of the three drawer units stacked on top of one another. The four larger square cubies underneath were another freebie from the hospital. There are two separate units that are on wheels. My paper racks were bolted on top of them and had been used in our ER for their history sheets. At first I was going to discard them but thought it would be nice to have the drawers up off the floor. My DH put a piece of wood across them so they would match the dimension of the drawers.

The four small square drawers are from another cubicle on the other side of the room. They don't actually fit nice and square in the unit, but they work. This is where I have all of my clear stamp sets. I can either finger through them or pull them out onto the island to find what I am looking for. My ribbons are on clothes pins in the candy jars above by color.


This is the area behind my desk. I have two of the Stampin' Up ink pad carousels and I love them. My miscellaneous pads are stored in the CD rack on the right and shelving unit on the left. This area is something I still would like to change. I want a white decorative shelf there but I'm not sure what to do with the misc. ink pads.

You can see my paper storage units underneath the cabinets. I have all of my embellishments in those cabinets and jars of buttons on top of the paper.


This is a view from my desk. It is a desk that I had in my old space and was built by my DH's grandfather. It needs a new coat of paint and I am planning on painting the yellow decorative pieces the same darker color of the room. I already have the new hardware that will really dress it up. I knew I didn't want my desk up against the wall. I wanted to be able to look out the window and skylights while I was working. I also wanted to be able to see the TV.

The rack that is attached to the back of the desk was a hand-me-down that my friend Carol no longer wanted. It is perfect storage for keeping things up off my desk. As you can see, I am hooked on Copics. The little rolling cart on the left side of the desk is just temporary right now until I figure out where to keep all my glues. I have my Ott Light over the desk for detail work. I still don't have everything in it's final resting place yet. I think I will have to work in the space for awhile until I can really know where everything needs to be.


My die cutting area is at the left end of the counter. This counter runs 19 feet along this side of the room. I wanted some things to be easily accessible so I decided to put it out on the counter. It still left me with workable areas along the length of the counter.


This is a view of the other side of the island. I have my paper cutters in the drawers and the lower cabinets are just a catch all right now. That is another area that needs attention when I know what I want to store in there. I love being able to get up from my desk and move around to the different stations I have created for cutting without having to walk clear across the room.


Further down the counter to the front of the room is where I store my Stampn' Up wheels, stickles and dollar stamps. The wheel storage is something my DH made me several years ago before he had his stroke. The spinning storage is from the storage line that Michael's carries. I purchased extra clips and I have the stamps grouped together by category. I find it so easy to find the stamp for that little area on a card that just needs a little something extra. I do have the black one that Hobby Lobby caries but it only has one ring. It does spin so much smoother so I am trying to decide where and what I want to hang on that one.


Next is my Cricut area. This was a limited edition Cricut from a few years ago. My son snagged one for me for Christmas on a Black Friday from WalMart. I have all of my cartridges in the drawer underneath. There are plenty of storage cubes around this area as well as speciality paper storage underneath.


This is my sewing area that was created from the counter top that originally came on the island. In order to use the deep upper cabinets we had to brace them up even though they are bolted to the wall. My DH knows me well and he said there is no way I was going to be able to keep from packing those cabinets full. The table leg on the counter doesn't seem to get in my way at all. I find it rather cozy when I work there. I was able to find a lamp shade that had French words on it and I added some trim for elegance. We still have some trim work that has to finish off the underside for aesthetic reasons. The pantry unit on the left side of the desk was something that I really wanted to use but had almost given up hope in finding a place for it. Due to the height and the limitations I had with the side walls, there weren't many places I was going to be able to put it. This is what I ended coming up with.

I guess the hardest part was having the cabinets and then trying to layout the room so that I utilized most of them. There was still a 30'' and 18'' upper cabinet that I wasn't able to work into the plan, so they will be used in the garage.

It is still a work in progress but I am really enjoying it and I realize just how fortunate I am to have such a place. If you have any questions or suggestions please share them with me.

~Have fun and enjoy!


Saturday, January 14, 2012

A bit of Winter

I thought this card would be appropriate today because it looks like our snow might be here to stay. Mind you it is only an inch or two, but it is mid January and I live in Michigan. I just hope Mother Nature isn't planning on delivering it all in March. That would certainly make for a very long winter, and I'm not a winter person. I know, then what in the heck am I doing in Michigan. I ask myself that a lot.

I made this card back in November when I got my Grand Calibur. It is made using the second to the largest Label 4 and then folded in half. I chose navy card stock for the base since the tree is a pale blue. I know it looks black in the picture. I certainly am going to have to invest in some new lights for my photo tent. I used the next smaller die and cut it half before I ran it through the Cuttlebug with a Sizzix embossing folder. The tree is actually one of the "Dress It Up" buttons with the shank cut off. I do not own the scallop oval die that it sits in but it is one of the navy blue ones and I think it might be from Marianne. I also use a MS edge punch for the doily band across the front. The picture below shows a better image of how I raised the tree to give it dimension. I absolutely love this shape for a card. I think it gives a touch of elegance even before it gets decorated.


I am sure everyone is waiting for CHA to arrive. It always means a bunch of new goodies goes out on the market for us to agonize over what to buy first. I must say, I have been very good on the shopping. Seeing exactly what I have after moving my studio and the cost of my new room, I find myself saying "I really don't need that". I almost feel a bit guilty having such a lavish room all to myself, but then I remember the phrase; "When mama is happy- everyone is happy". Here's to a happy weekend.


~Have fun and enjoy!

Saturday, January 7, 2012

Kindness Matters

Wow, I can't believe it has been a month since I last posted. I honestly have only been on the computer a half dozen times since then and that was to do some Christmas ordering. I kinda got lost with Christmas decorating and my new stamp studio. The kids were home for Christmas and as I had mentioned before, the timing of the new studio was not ideal. I did manage to get 95% of my things moved in. It was enough that I could set up the spare bedroom in my old place so the kids had somewhere to sleep. Moving Elliot's things out of the loft that is now my studio was a bit easier than I thought it was going to be. I still need to do some repainting and decorating in the new spare bedroom but that can wait. The walk in closet in the new spare bedroom still has that 5% of my things nicely stored. I can now just walk it up to the studio and put it in it's place- as soon as I find out where that would be.

I promise to post some pictures of the new studio as soon as the chandelier is hung. Yes, you read that right, a chandelier. I have always wanted a crystal chandelier hanging over our tub, but the DH thought that was a bit ridiculous, especially since there wasn't an outlet already there and we hardly ever use the tub. I saw this as a perfect opportunity to have my crystal since this was my dream craft room and my daughter gave me money for Christmas just for the cause. It arrives today and hopefully will be up by next weekend. I think it is going to take me a few hours just to put all the crystals on it in the right place. I am hanging it right over my desk so I get a perfect view every time. I was fortunate enough that after the desk and island were placed, there was a can light right up over my desk- a perfect spot.


Today's card reminds us that it is just the little things that can make a difference in someones life. Kindness is certainly something this world could use more of. It may be a simple as a smile, a thank you, holding the door for someone or just letting someone know you care. It really is the little things that can have the biggest impact. I used SU Cherry Cobbler and Kraft card stock. The embossing folder was one of the new Sizzix's and the green tag was created with a mini embossing folder from Stampin' Up. The sentiment was also from SU. I decided to keep my computer down in the spare bedroom and all of my supplies are upstairs now. It was a bit easier when I needed to know the details of my card when I was posting and everything was right in the same room. Oh well, if anyone wants to know the stamp set it came from I can reply back to you.


I hope you all are having a wonderful New Year. I am hoping that things start to slow down and I can sit and enjoy my new space.


~Have fun and enjoy!


Saturday, December 3, 2011

A quick Christmas card before I head back to the tasks of my new stamp studio. It certainly isn't moving along fast enough for me, but I have had way too many holiday obligations to focus on the project. If I had been smart, I wouldn't have started this project until January. Oh well, I am up to my eyeballs in it and there is no going back now.

This Christmas card is all Stampin' Up. The image is from the set Christmas Lodge which is in the holiday mini catalog until January 3rd. I also used the top note die and the petals a plenty embossing folder. If you click on the picture you can see that I added some glitter to the roof top to look like snow and add that needed bling. Looking at it now, I guess this is a very patriotic Christmas card and not your typical Christmas colors. Every now and then we need to spice things up to keep it from getting boring. I try to force myself out of my comfort zone every now and then for creative growth. Talking about creativity, make sure you catch Tim Holtz's 12 tags of Christmas on his blog. His videos are awesome and very detailed. He has a new tag every day that he creates the night before. Talk about pressure.


I hope you all are having a much more calming and relaxing week than I am having. I swear next year is going to be different and I will have my Christmas cards made in November and no major projects for December other than the ritual Christmas trimmings. On second thought don't go betting money on that, I am know I am a glutten for punishment any time of year and I would hate to be responsible for your financial losses.

~Take care and enjoy!