This is the pride and joy of my new studio. I have always wanted a chandelier but the DH wasn't too thrilled to have one over the tub. I have now found the perfect place for it, right over my stamping desk.

As you can probably gather, I have taken on a Paris theme to my new space. Most of the items have been gifts to make it such a special room of love and kindness. The dress form was a gift to myself.

The room is very long. It is the bonus room up over the three car garage and measures 11' x 30'. It didn't take long before it started to feel small. The white cabinets were a great find on Craig's list including the island. I still need to patch a few nail and screw holes. I also want to add some more trim to fancy up the island.


It was difficult to use all the cabinets because the side walls were so short due to the angle of the ceiling. The guys who put up these side cabinets, called them my "Snookey" cabinets. They are rather low but I really like the extra storage. The table below them can be pulled out and raised if needed. I have my photo tent underneath the table and it sits on the floor. I just raise the skirt and it is all set up with the lights. One flip of a switch and all the lights are on. The table made a perfect place for my coffee maker and 100 calorie treats.

This is a close up of the island and my desk is just beyond it. I had the granite made a little longer on the end so that an extra friend would have a place to stamp.

This shelf was such a find. It was being thrown out at the hospital and since I now all of the maintenance guys, they were happy to load it into my car rather then the dumpster. A new coat of spray paint and I have a beautiful treasure for my favorite wood stamps.
 This is where all of my wood stamp sets are stored. A majority of them are Stampin' Up but the others are categorized and stored in extra cases from Stampin' Up. Of course they are stored by category- sentiments, words, flowers, tags, holidays ect.
I put up a curtain and took down the closet door because the door opened in and it took up too much of my storage space. It isn't a very big closet but I was able to get two tall book cases in there as well as a shelf. It has a nice bright light so it is very easy to find things.
 This is how I store some of my punches. The edge and matching corner punches are on the shelf along the other side of the room.
This cabinet is where all of my designer paper is. The single sheets are stored by color in the stand up paper holders. The packs of paper are stored by theme and manufacturer.

This cubicle unit is several of the three drawer units stacked on top of one another. The four larger square cubies underneath were another freebie from the hospital. There are two separate units that are on wheels. My paper racks were bolted on top of them and had been used in our ER for their history sheets. At first I was going to discard them but thought it would be nice to have the drawers up off the floor. My DH put a piece of wood across them so they would match the dimension of the drawers.
The four small square drawers are from another cubicle on the other side of the room. They don't actually fit nice and square in the unit, but they work. This is where I have all of my clear stamp sets. I can either finger through them or pull them out onto the island to find what I am looking for. My ribbons are on clothes pins in the candy jars above by color.

This is the area behind my desk. I have two of the Stampin' Up ink pad carousels and I love them. My miscellaneous pads are stored in the CD rack on the right and shelving unit on the left. This area is something I still would like to change. I want a white decorative shelf there but I'm not sure what to do with the misc. ink pads.
You can see my paper storage units underneath the cabinets. I have all of my embellishments in those cabinets and jars of buttons on top of the paper.
You can see my paper storage units underneath the cabinets. I have all of my embellishments in those cabinets and jars of buttons on top of the paper.

This is a view from my desk. It is a desk that I had in my old space and was built by my DH's grandfather. It needs a new coat of paint and I am planning on painting the yellow decorative pieces the same darker color of the room. I already have the new hardware that will really dress it up. I knew I didn't want my desk up against the wall. I wanted to be able to look out the window and skylights while I was working. I also wanted to be able to see the TV.
The rack that is attached to the back of the desk was a hand-me-down that my friend Carol no longer wanted. It is perfect storage for keeping things up off my desk. As you can see, I am hooked on Copics. The little rolling cart on the left side of the desk is just temporary right now until I figure out where to keep all my glues. I have my Ott Light over the desk for detail work. I still don't have everything in it's final resting place yet. I think I will have to work in the space for awhile until I can really know where everything needs to be.
The rack that is attached to the back of the desk was a hand-me-down that my friend Carol no longer wanted. It is perfect storage for keeping things up off my desk. As you can see, I am hooked on Copics. The little rolling cart on the left side of the desk is just temporary right now until I figure out where to keep all my glues. I have my Ott Light over the desk for detail work. I still don't have everything in it's final resting place yet. I think I will have to work in the space for awhile until I can really know where everything needs to be.


My die cutting area is at the left end of the counter. This counter runs 19 feet along this side of the room. I wanted some things to be easily accessible so I decided to put it out on the counter. It still left me with workable areas along the length of the counter.
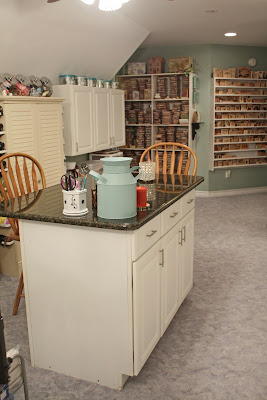
This is a view of the other side of the island. I have my paper cutters in the drawers and the lower cabinets are just a catch all right now. That is another area that needs attention when I know what I want to store in there. I love being able to get up from my desk and move around to the different stations I have created for cutting without having to walk clear across the room.

Further down the counter to the front of the room is where I store my Stampn' Up wheels, stickles and dollar stamps. The wheel storage is something my DH made me several years ago before he had his stroke. The spinning storage is from the storage line that Michael's carries. I purchased extra clips and I have the stamps grouped together by category. I find it so easy to find the stamp for that little area on a card that just needs a little something extra. I do have the black one that Hobby Lobby caries but it only has one ring. It does spin so much smoother so I am trying to decide where and what I want to hang on that one.

Next is my Cricut area. This was a limited edition Cricut from a few years ago. My son snagged one for me for Christmas on a Black Friday from WalMart. I have all of my cartridges in the drawer underneath. There are plenty of storage cubes around this area as well as speciality paper storage underneath.


This is my sewing area that was created from the counter top that originally came on the island. In order to use the deep upper cabinets we had to brace them up even though they are bolted to the wall. My DH knows me well and he said there is no way I was going to be able to keep from packing those cabinets full. The table leg on the counter doesn't seem to get in my way at all. I find it rather cozy when I work there. I was able to find a lamp shade that had French words on it and I added some trim for elegance. We still have some trim work that has to finish off the underside for aesthetic reasons. The pantry unit on the left side of the desk was something that I really wanted to use but had almost given up hope in finding a place for it. Due to the height and the limitations I had with the side walls, there weren't many places I was going to be able to put it. This is what I ended coming up with.
I guess the hardest part was having the cabinets and then trying to layout the room so that I utilized most of them. There was still a 30'' and 18'' upper cabinet that I wasn't able to work into the plan, so they will be used in the garage.
It is still a work in progress but I am really enjoying it and I realize just how fortunate I am to have such a place. If you have any questions or suggestions please share them with me.
~Have fun and enjoy!
Next is my Cricut area. This was a limited edition Cricut from a few years ago. My son snagged one for me for Christmas on a Black Friday from WalMart. I have all of my cartridges in the drawer underneath. There are plenty of storage cubes around this area as well as speciality paper storage underneath.
This is my sewing area that was created from the counter top that originally came on the island. In order to use the deep upper cabinets we had to brace them up even though they are bolted to the wall. My DH knows me well and he said there is no way I was going to be able to keep from packing those cabinets full. The table leg on the counter doesn't seem to get in my way at all. I find it rather cozy when I work there. I was able to find a lamp shade that had French words on it and I added some trim for elegance. We still have some trim work that has to finish off the underside for aesthetic reasons. The pantry unit on the left side of the desk was something that I really wanted to use but had almost given up hope in finding a place for it. Due to the height and the limitations I had with the side walls, there weren't many places I was going to be able to put it. This is what I ended coming up with.
I guess the hardest part was having the cabinets and then trying to layout the room so that I utilized most of them. There was still a 30'' and 18'' upper cabinet that I wasn't able to work into the plan, so they will be used in the garage.
It is still a work in progress but I am really enjoying it and I realize just how fortunate I am to have such a place. If you have any questions or suggestions please share them with me.
~Have fun and enjoy!