Sunday, April 26, 2009

My acrylic book


Yesterday I got together with some old friends from a stamp group that I belonged to. The stamp store closed not due to economic times but rather family obligations. I really miss this group because there were several talented people who did a great job teaching us new things. The owner of that store(Cindy) and a few others have become close friends with the well known artist Amy Flowers from Shrew'd Arts. She teaches classes all over the U.S. and if you ever get the chance to take a class from her you won't be disappointed. She lives in Ohio but loves to travel. She is truly awesome at what she does and she brings absolutely everything for each person in the class. She is very laid back, easy to learn from and not pretentious.

I have to brag here just a little. While I was working diligently on my book, Amy was walking around to offer help to anyone who needed it. I wasn't aware she was standing behind me and she made the comment "Kim I should pay you to make samples for me". She could have offered my a thousand dollars but it was the compliment coming from a well known artist that was the feather in my cap.

Anywho... Cindy had contacted me about this upcoming event. The class was held at Pat Bober's home (a beautiful place on the water and a studio to die for) and it seemed like family again. I haven't seen anyone from this group in over a year but it was like going home. We all had such a great time and it was nice to catch up on what has been happening in our lives as we shared what we have been up to (it is always nice to hear the other side of the story). It was a small group which makes the class easy to learn especially when it is a 3 hour class and believe me the 3 hours went by fast.

The class was entitled "Heavy Metal Book" because we used a lot of metal tape and did some soldering on acrylic. This project is eclectic and grunge mixed together which is my favorite. There were several times that I had to cover up little mistakes or just let it be. When you are working with liquid inks you can't be as precise, but this is what gives it character. I won't give away all the secrets in how we did this book out of respect to Amy but I can tell you some of the supplies we used.


This is the front cover. We used 3 acrylic sheets and believe me I had to keep moving to get it finished. The window on the front was soldered on. I did add to the book last night when I got home as I didn't have some of the embellishments with me at the class. Amy supplied an enormous amount of ephemera- stickers, paper, stamps, ribbon and clear overlays so I didn't have too much more to do to finish it off. On the cover I added the wings and brad to look like a door knob. I outlined the stamped image with my stardust gel pen for some extra dimension. Stamping on acrylic is difficult; we used Stazon but it still likes to slide. You can click on any of the pictures to enlarge them for more detail.


This is the backside of the cover which doesn't look much different than the front. Amy said the hardest part of the project for the students is to plan the layout so that once the book is together you can look through it. Meaning when the book is closed you can still see the other pages and they don't compete with one another. Go back to the very first picture of the finished book. See how you can see the lady on the second page through the front cover. This does take a lot of thought and it isn't that easy to come up with an idea and finish in a short amount of time. I only had a small description of the class as to what we were making with no picture so I wasn't able to visualize what my project was going to look like.


This page was one of those that I had to improvise. The stamped lady didn't come in contact with the acrylic in the middle (hate when that happens) so I stamped the word "imagine" in the blank spot. If you hold this page up to the light, the images on the backside show through. I used the new Stazon opaque inks on this page.


This is the backside of the second page. See a faint image of the front. The silver pieces are all metal tape.

This is the last page which was my least favorite. It is the result of the back cover. The leaf was out of Pat's yard and I wanted the skeleton of that and the dime to show on the back. Since it is put on acrylic you end up seeing it on this side. This is the whole idea of using acrylic. If you don't like this look than you would just use a board book. I wished I had colored my acrylic a bit darker so these items were more subtle. I then just started layering and collaging. If you look real close you can see script over the dime which was done with the Stazon light blue opaque ink. I put the dime in there so that if I ever sold the book I should be able to sell it for at least 10 cents-hee hee.

Here is the back cover and you can see the imprint of the leaf in the center. Some of the girls used feathers or silk flowers and they turned out beautifully.
I hope you enjoyed my book. Amy brought new stock of all the supplies we used so that we could purchase them. I bought the inks and a new book which has 6 acrylic pages so I can try my hand at another one. I learned a few tips from this book so my next one should be even better.

Have fun and enjoy!

~Kim


Friday, April 24, 2009

The spinner


Just a quick post tonight. I forgot that I had mentioned this new storage tool in a previous post and I had forgotten to show you what it looks like. Sorry about that! What I love the best about this is that I don't have to take the pads off to change colors. Once they are on they don't come off the easiest when you are trying to just grab a very small piece of the corner so your fingers don't get stained. I have actually torn the corners as I am trying to pull them off. This storage allows me to keep using the same pad over and over again without having the inked pad all over my supplies and my desk itself.

I found this on QVC at a very good price. You have to be careful though because each item has it's own shipping cost so depending on what you are ordering it might not end up being such a great buy. I purchased each of the handles from JoAnn Fabric with a 40% coupon so it took me a bit of time to fill up all 8 spots. You will notice the one odd burgundy one which is one that I already had. I think that one is by Tim Holtz .

I must admit this spinner reminds me of when we were kids and we would pretend playing school. Who ever was the librarian would have been in heaven with this. You could really kick butt- checking out the books with this many handles. I really am fortunate that I can go back into my childhood memories and find such happy places. I'm sure there are so many out there that aren't that lucky. My parents were/are (my mom passed away 5 years ago but dad is still with us) very loving and respected people. They taught us right from wrong, good manners, values and how to work hard for what we wanted in life. I think my father's work ethics are what has resulted in me working at the same place for 21 years rather than a different job every 2-3 years. I learned that it isn't always "somebody else's fault" and there are times you just have to hang in there and suck it up rather than just quit. There is nothing sorrier than a quitter in my book. We were taught to work hard for what little pay it might be, rather than just accepting a handout. Most of all they set a good example for us and they were people we could be proud of rather then embarrassed by. There isn't anything of more value that my parents could leave me than a good up-bringing and being able to realize it. My children have already thanked me for the way I have raised them. They have told me verbally in conversations we have had, but more importantly they have showed me by the wonderful and productive adults they have turned out to be. That is a true compliment.

Have fun and enjoy!

~Kim

Wednesday, April 22, 2009

What day is it?


A Saturday sketch on a Wednesday. I wonder if anyone will start that one. Anyway this was a card that I created for Lauren Meader's Saturday Sketch this past weekend. I wanted to save this for earth day- going green. I thought it fit so well. I loved these colors and I must say I really like these challenges. I have heard some say that they really feel boxed in when they are given a template to follow and they just can't seem to come up with anything. I think if you try too hard it creates a block. Just relax and start to play with it. The more you create following a template the easier it gets. I am having a lot of fun with them and my creativity just seems to flow.

I am looking forward to this weekend. My son's artwork has been published in the college magazine and they are having a reception for him and the other students whose work was also published. I am very proud of him but I can't take all the credit for his artistic genes. Before my husband's stroke he could draw anything. You wouldn't believe the things that man could draw with an etch-a-sketch. I'm not talking stick figures here, he drew as if he was using a pencil. My father-n-law also is very talented when it comes to painting and drawing so it must be that side of the family. Congrats Elliot- I am so proud of you!! (do you think that will get me my new blog design) hee hee!


Here is a little something I got on QVC. I think it also came in black but the white looks so good in my stamping room. I'm not sure who makes this. The labels on the jars say Floral embellishments. The small flowers are about 1/4" and are just the right size when using them in threes or fives. Each jar is 3 1/2 inches high and packed full- as you can see.

Well that is it for tonight. I need to make a Secretaries Day card for work tomorrow and a Birthday card for Friday. I better get busy.

Have fun and enjoy!

~Kim

Supplies

Stamps: Imaginisce-Fairest of them all, tree; Fiskars- Tartan'n Time
Paper: SU- taken with teal, tempting turquoise; DCWV- citrus stack.
Ink: SU- tempting turquoise, white
Accessories: Martha Stewart edge punch, Prima flowers, Kaiser Craft- square rhinestones

Monday, April 20, 2009

Bargain Baby...

Just about everything I used on this card was a bargain. I absolutely love the white satin floral trim on this card. I was in my local stamp store on Saturday and a friend showed me this satin trim she just purchased (thank you, thank you, thank you Doris). She said she found it in the stamping section but since she used to work there she knew it was ticketed in the wrong department and no one knew where it had come from. She had purchased 3 yards and there was still plenty left. I was talking to another member of our stamping group at the time and she said she would also like to get 3 yards. I took it to the cutting counter and had them cut the 3 yards for Audrey and then I would buy what was left. To my surprise there was still 6 1/2 yards left. Hold on to your chair when I tell you how much it was. Ready..... only .47 a yard. I couldn't believe it. It didn't come in any other colors, but I have enough to share with my stamping pals.

The blue plaid ribbon is the same as the purple ribbon I used on the rooster card in an earlier post. It was from Hobby Lobby at $3 for 10 yards (50% off). The designer paper is Chloe's Closet from Making Memories. I found this on clearance at Michael's while I was in Florida. It was only $2.35 for a 6x6 pad of 36 papers. The designer label punch was also a good deal since I am a Stampin' Up demonstrator. The flower punch is by The Paper Studio which goes on sale at HL for 50% off quite often. I chose to use the little butterfly stamp in the bottom right corner instead of brads or eyelets. It was only .99 as wood mounted by hero arts. Brenda at Mary Maxim breaks up sets of stamps, grunge board, stickers and such- then sells them individually so it is more affordable for her customers. I like it because there is always something in the packages that isn't appealing to me. Now I can buy just what I like. She doesn't price it to make money, she divides up the package price by the number of pieces. That is a good business woman.

The card stock is SU Buckaroo Blue which is a retired color but still one of my favorites and one in which I have quite a good stash of. The ink is SU Night of Navy and their white opaque uni-ball Signo gel pen- love that little thing. I used my stardust gel pen on the butterflies to give them a bit of bling. I don't remember where I got the blue rhinestones but I know I got them on sale somewhere. I hardly ever buy something unless it is on sale or I have a coupon.

Today it was damp rainy and cold. We may get a few snow flurries out this tomorrow. Let's hope the meteorologist is wrong again. Being Michigan- it is supposed to be up in the 70's again by the end of the week. It was nice to come home from work tonight and get right into my jammies. For all you young mothers out there, this is what you can look forward to when the kids have grown up.

Hope you enjoyed my bargain card. It was made from items I just had to have. Isn't it funny how as stampers we no longer have the word "want" in our vocabulary. It has been replace with "need" like we wouldn't be able to breathe if we didn't have it.

Have fun and enjoy!

~Kim

Sunday, April 19, 2009

A cup of tea...


Here is the teabag project I made earlier this week. It doesn't take much time and it very simple to make. You could use regular card stock for this but I chose to use double sided paper so the inside was decorated as well. The verse that goes on the inside is in the last photo. I just printed it on the computer onto paper that matched the color scheme. I'm sure there are several verses you could use, and using a teapot stamp would be perfect. Play with it and make it your own. This is just a general template for you to follow.

If you aren't a tea drinker I just wanted to give you a heads up on the bags. They don't all come individually wrapped in the box and I don't think you would want to just put the bare teabag in the card.

Here are the instructions for this 3 3/4" x 3 1/4" finished card.
This is actually the outside print of the card. The print showed up better on the mat I was using to photograph on. I hope this doesn't confuse you. You will need to cut a piece of paper 9 3/4 x 3 3/4. Score it at 3 1/4 and 6 1/2 inches.


This is the inside view of the card. On the right end of the card, measure 1" up from the bottom. At this mark you will cut a diagonal from this mark up to the 6 1/2 score mark. This is what will create the pocket to hold the teabag.


I used my 1/4 inch terrifically tacky tape. I didn't want to use anything wider because the wider the tape the smaller the pocket will end up being. Only put the tape on the 1" side and along the bottom to create the pocket. Do not put any along the diagonal.


There will be a 2 1/4 x 3 3/4 piece of scrap paper left over. This is the piece I used on the left hand side to decorate the inside a little more and to cover up the edges of the ribbon I wrapped around from the front of the card. It will fit perfectly without having to trim it which is even more of a reason it use it. I also used my rectangular scallop nesties. The dark chocolate brought out the color in the designer paper very nicely. It looks black in the picture but it is a very dark chocolate.

The person I had this in mind for is a dedicated tea drinker. She likes things simple so I tried to keep that in mind when decorating the front. Right now she is trying to prepare an annual budget at work and it is always a very stressful time. I figured this would be the perfect time to send this to her. I hope she enjoys it as much as I had fun making it. Remember, a little gesture as simple as this can mean the world to someone when they are having a rough or stressful time.

Have fun and enjoy!

~Kim

Supplies
Paper:
Autum Leaves- Tiffany's
Accessories: Spellbinders- rectangular scallop nestabilities, Prima flowers, ribbon, gems

Saturday, April 18, 2009

No, not yet...

This is still the original Dragonfly Dreams. As I said on a previous post- my son said he would customize my blog so I would have a nice fancy header. Well I am still waiting and while I was at stamp club Thursday night he decided to play around with the html template. I didn't realize it until today when a friend asked me why I changed the colors on my blog. To my horror when I opened it up I noticed a few minor changes- colors, date and time format, no biggy but I wondered what had happened. It is the same color scheme but just switched around, hardly noticeable.

When I post I don't go into see the finished product because I am usually pressed for time (hence why I didn't notice it yesterday) so I simply post and run. For those of you who don't have a blog, you create the post in a different screen on blogspot and then hit post which sends it over to the main page. I am still waiting for the real thing to happen but on Elliot's "priority list"- mom's blog is somewhere at the bottom. That's OK because school and work come fist. I had originally wanted to pay for a personalized design but being the artist that he is, he wanted to do it. Now I just have to wait, but I know it will be worth it.


So while I wait I created this pretty purple card. It was all designed around the ribbon. I found it in the bridal isle at Hobby Lobby and it comes on a 10 yard spool for $5.99, but get it when it's 50% off. It also comes in a pretty dark blue. I have to fill you in on a little joke at work. One of our Cardiologist's is always teasing me about how much I shop at Hobby Lobby. He still can't get the name right and he is always asking me if I was at "holly lobby" again. He says that they won't go out of business as long as Kim still has a job.

The weather is beautiful out today so I need to end here and get out into the sunshine. I need to clean the fridge out in the garage so today would be a nice day to take a bucket of water out and take care of that.

Have fun and enjoy!

~Kim

Supplies

Stamps: Fiskars-Vintage Farmhouse
Paper: PTI- plum pudding, The Paper Studio- baci-della ornate, SU- black, silver Accessories and Tools: Spellbinders Nestabilities-large octagons and large scallop octagons, Hero Arts- black gem stones, PSX-detail black embossing powder, SU- ticket corner punch

Friday, April 17, 2009

thanking the kind gestures of friends...


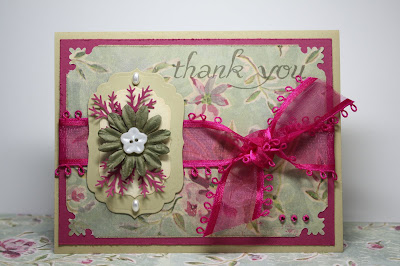
Here is a thank you card that I made to thank some new friends in Florida. We were invited over to Fran and Dan's house for dinner and I really enjoyed spending the evening with them. Dan is an awesome cook on the grill and Fran knows just how to pull all the sides together for a fabulous dinner. A hand made thank you offers so much more gratitude because it is made from the heart. I hope I am not spoiling this because they most likely won't get the card until later tomorrow. Let's hope Fran won't be on my blog for a few days.

This isn't raspberry fizz but I bet the ribbon is pretty close. The card stock is SU river rock and purely pomegranate (no longer available). The printed paper is Brenda Walton -Madeline wild roses. I used my new Spellbinders Label 4 nesties and the Martha Stewart fern punch. This punch gives such a delicate feel to the card. The ribbon was one of the $1 spools from Michaels and I found a nice olive colored prima flower in my stash. The sentiment is from Tinkering Ink Clear Stamps- simply spring. This stamp set has a set of birds, a flourish, three other sentiments and some flowers. It is one of my new favorites. A few oval pearls and some rhinestones finished the card nicely.

I belong to a stamp club and we meet once a month. Last night we made a cute little card that you can tuck a teabag into with a very cute verse to go along with it. I will post a picture with instructions and the verse this weekend. It's the perfect little card to give to a friend that needs a pick-me-up. There are 6 of us who usually sit at the same table. One had been in Florida for 10 weeks (lucky girl) and one had surgery, but last night it was nice for friends to be back together again. The 6 of us also get together each month on our own and we work on individual projects or something special if one of us wants to try to teach the rest. We have such a good time stamping but we never seem to get a whole lot done. Having fun is all that matters even if we are putting paper into the crimper backwards or scoring at the wrong measurements; we just enjoy each others company.

Have fun and enjoy

~Kim

Tuesday, April 14, 2009

On his way to awesome

This is a card that I made for a co-worker who has lost 32lbs. He had the lap-band weight loss surgery 4 weeks ago. He wants to loose at least another 70 lbs. and we are very supportive of him in his journey. I told him he was on his way to awesome.

I always have such a hard time with masculine cards as I think a lot of us do. My difficulty is not being able to use my favorite foo-foo embellishments and ribbon. I have a very hard time trying to keep it plain and simple. I used sage green, burgundy and copper card stock along with my newest spellbinder label four and MS edge punch.

He loved it and more than the card itself he appreciated the support that it represented. I always find it amazing at what a little card can do. I told him that is what friends do. They support each other rather than get jealous. You can imagine how much I would love to loose 30 lbs.

I had a friend who really ruined our friendship due to jealousy. I never felt our friendship was a competition but she seemed to turn it into that; the clothes I wore, the friends we had in common, our artwork. I had complimented her and another friend on how beautiful their work was and she made the comment-"but we don't tattle about it on a blog". As you can imagine this really hurt at that moment. My whole intention with my blog was to give others inspiration. I have since gotten over this with the help of a really true friend who helped me to see that this negative person has a lot of mental hang-ups and I am not going to let her mental health affect my love of stamping or my creativity- Thanks again Carol, you are truly a wonderful friend. I have had far more people tell me how much they enjoy my work and my blog. It's too bad that some people can be so miserable with their life that they feel the need to project their negativity on others. What I feel the worst about is that these people don't do anything to help themselves except look for pity. I don't need that in my life so I guess I have one less so-called friend.

Thanks for letting me vent and I promise you I will not be ending my blog. God gave me a gift and I plan to share it. I can now put this to rest and forget about it. Thanks to all of you who are so supportive of me.

Have fun and enjoy!

~Kim

Sunday, April 12, 2009

Happy Easter

What a wonderful time of year. Easter always means rebirth and a new beginning. The start of a new season- well at least in most areas of the US. We just got rid of our snow and it went into the 20's last night. I hope all of you had a nice Easter. We had a pretty quiet one here. The kids are grown and I think this was the first year we didn't color eggs. I did however leave an Easter basket out for the Easter bunny to fill. He did a pretty good job this year. I was a very good girl and only had 3 pieces. The older I get the less I crave chocolate. Whats up with that. It must be the hormones starting to change.

I am missing the Florida weather and my tan is fading a little. I looked pretty pathetic sitting out on the deck out of the wind trying to soak up some of the sunshine we had today. It sure felt good and even though it only got up to 45 degrees I actually got a little bit of a sunburn.

I don't make too many Easter cards. I love this stamp but I still haven't found a way to use it that satisfies me. I tried to add a bit of color to the box and ribbon that the rabbit is holding. Tried the gamasol method. I guess I need more practice. I found a solvent bottle on e-bay to hold the gamasol. They are the bottles that nail technicians use for nail polish remover. It was only $2.33 and is the pump type that will hold a bit of the solution in the upper part after you pump it a few times. It also has a flip closed lid to keep the gamasol from evaporating. Beats the glass ones that run for $24 or more for as much as I will use it. I needed to tone down the light pink so it looked more vintage like the printed paper but when I was done it looked peach but I went with it anyway.

Hope the Easter bunny was good to you and that you find all those hard boiled Easter eggs.

Supplies:
Stamps: Paper Inspirations
Paper: Brenda Walton- Madeline Wild Roses, SU- always artichoke, pink pirouette.

Ink: SU- always artichoke, Ranger Distress Ink-antique linen, Koh-I-Noor pencils.
Accessories & Tools: Spellbinders- long scalloped rectangles, SU ticket punch, Prima flowers, The Robbins Nest- hyacynth.

~Kim

Thursday, April 9, 2009

Tags, tags and more...


I love to make tags because they give me such quick gratification. I purchased some of the Tim Holtz masks and went to town with my distressed inks and blending tool. I love using these masks so much that I purchased several of the handles with 40% coupons at Jo-Anns over several weeks. I also found a "spinner" that holds all the handles so I don't have to keep taking off the pads when I want to change colors. I will try to remember to post a picture of the spinner soon. I actually found it on the QVC website.

The last tag has some of the beautiful ribbon I got at The Owl and the Pussycat. You know me and ribbon. A girl can never have enough shoes or ribbon. These tags are really easy. Tim has instructional videos on his website on how to use the masks and blending tools. You will just love it.

This is just going to be a short one tonight. I have all these new supplies but I haven't even taken them out of the box yet. I had to ship a box home from my vacation to Florida. Got a little crazy in the stamp stores down there. Need to get a little Mojo back. I think the snow we just had made me a little depressed after coming back from 88 degree weather. It's all melted now so I'm good to go.

I almost forgot a list of the supplies I used. I will have to go through my stuff to get company names and that is going to take some time so I will post an edit to this post tomorrow with the supplies.

Edit
Tag 1 supplies: Tim Holtz -concerto mask, Cleaer Art Stamps- bird notes, DMD Clear Stamps- borders, Tim Holtz clear stamps- life's possibilities, ARTchix Studio- winged cuties, Silk ribbon, Ranger distress inks- vintage photo, dried marigold, peeled paint.

Tag 2 supplies: Tim Holtz- flourish & timeworks masks, Tim Holtz clear stamps- life's possibilities, Prima- Got Flowers?, Brads, Fibers, Ranger distress inks- shappby shutters, broken china, faded jeans, vintage photo.

Tag 3 supplies: Tim Holtz- concerto mask, Paper Studio Clear Stamps- botanicals & birds, The Paper Company clear stamps - faith greetings, Brends Walton- Madeline Butterfly ChipBox, Ranger distress ink- shabby shutters, faded jeans, Prima- artful collage flowers, Rhinestones.

Have fun and enjoy

~Kim

Monday, April 6, 2009

The Journey

As I said in my last post- I didn't get much done in the way of stamping while I was on vacation because my priority was to enjoy the sun and sights and boy am I glad I did. It was 88 degrees when I left Florida and this morning I woke up to snow and slush. You have got to be kidding. April and we are still getting snow? Now I just close my eyes and imagine myself floating in the pool and I can almost feel my body soaking up that sunshine. OK so it's the blanket I have wrapped around me that is keeping me warm. Don't burst my bubble.

This is a card that I created around the larger tag from the Que Sera Sera line of K & Company. I found it so fitting since I was on my own little journey. You know how it is when you get something new and you just can't wait to use it, rather than putting it into your stash and using it as needed. Somehow I find it harder to create a card this way rather than selecting my color combo first and then finding the embellishment to fit. These are some awesome tags and they go perfectly with the same line of paper. The detail on the tags is beautiful. The teal stitching was even already done for me. I did have to add the tan piece with the three brown brads. I guess this is where you could put another smaller tag with a message on it if you wanted. The printed paper is "Far East" by DCMV and the card stock is SU Tempting Turquoise and Ruby Red. I toned it all down with some distress ink. The Prima flowers are something new that I picked up while in Florida. I just love how they come packaged in a clear tube that looks like hand lotion would come in. The stamp is from Catslife Press. I got it at this fantastic stamp store called The Owl and the Pussycat in Fort Myers. They have the best things in this store that I haven't seen in any stores around here. What a treat it was.

I have a habit of making cards where everything matches so perfectly. I think that is what I like the most about how this card turned out. The colors are of the same hue but they aren't a perfect match and that's OK. I am trying to get a different feel for some of my cards rather than just doing the same thing over and over. I hope this is what I am also helping you to do. I go to other blogs for inspiration and tips than can take me out of my comfort zone. I said in my first post that I was creating this blog as a place where others can find inspiration and their inner creativity.

I also had some time to make a few tags with some of the new Tim Holtz masks and stamps. I am always more in my element when I have Tim with me. I will share these with you in my next post after I pack my bags and head back to Florida. Just kidding! That is the reason for the other little quote on the card- Hope and Dream.

Have fun and enjoy!

~Kim

Saturday, April 4, 2009

Home again...


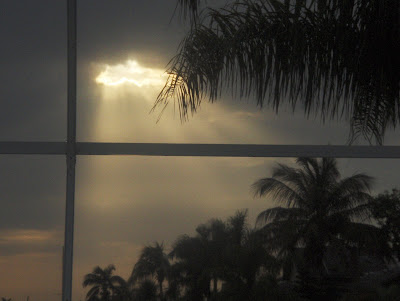
When I left for Florida I posted a picture of a beautiful sunset, so I thought it was only fitting to post a beautiful sunrise that I took while I was there. Every morning I had my coffee by the pool overlooking the canal as the sun came up everyday to greet us to a beautiful day. My friend Carol is very fortunate to have this everyday. The weather was in the 80's and it only rained once. I certainly didn't mind because I love thunderstorms. I sat out in the open lanai with my morning coffee and listened to the thunder and watched the dolphin that came in for the morning fish. It was a very relaxing trip and I can't thank Carol and Jean-Paul enough for their wonderful hospitality and four star accommodations. Also a big thank you to Fran and Dan for a spectacular dinner and great conversation. They are great couple but they don't know what they are missing in the Rum Raisin ice cream- more for Jean and me.

I didn't get home until after midnight Wednesday and had to go into work yesterday so I don't have any cards to post just yet. I did make a few things while I was in Florida but haven't photographed them. I plan on making a few things this weekend and should have them up by Sunday. I thought I was going to do more stamping than I did. Even though Carol told me not to bring anything, I had a carry-on that almost broke my back with my stamping supplies. I am glad my stamping things enjoyed a trip to Florida also. I just couldn't see myself stamping when I could be relaxing and floating around the pool while soaking up that beautiful Florida sun. I even have a beautiful brown tan for my efforts. I figured I can stamp at home in Michigan but I certainly can't be laying out in the sun in 40 degree weather.


Here are a few more pictures of the wonderful sites of Florida.


This is a hibiscus outside of Carol's front door.


Sanabel
Island on the Gulf of Mexico. It was very windy and they were setting up for an outdoor wedding that afternoon on the beach, or should I say trying to set up. Best wishes to the bride and groom whoever you are.


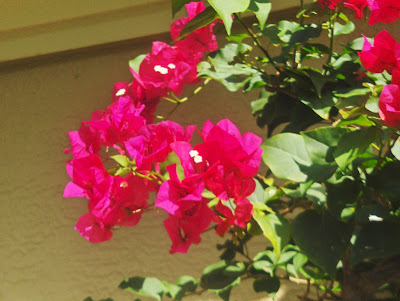
I don't remember the name of these flowers but they are very common. This bush is growing over the garage door at Betty and Joe's who we visited in Naples. Their home is absolutely beautiful. Betty you certainly have good taste in decorating.


This is the same view of the sunrise picture, but as the sun was setting that very same day, I was able to capture a reflection of the sun in the water. What a hard way to live.


Jean-Paul's son took us out on his boat for a tour on the canals. Here is a picture of the dolphins we saw, along with how the other half of the world lives.


Hope you enjoyed a little peak into my fabulous vacation. Carol- it wouldn't have happened without you. Love you and thanks again girlfriend!

Enjoy

~Kim