Tuesday, December 29, 2009

What is your name?


I will be taking over as president at the local stamp club that I belong to. There has been quite some excitement over the change and I hope I don't let anyone down. To start the year off I want to make name tags so we can get to know each other a bit better. I had originally thought of making the tags into pins and then someone mentioned the idea of necklaces because they don't always like to put a pin through some of their favorite shirts. Here is what I came up with as a sample for a necklace. These are just counter top tile samples found in hardware stores. I just added some embellishments and hardware I had laying around. Of course I had to have a dragonfly hanging on mine as my signature. I just used stickers for my name. I used organdy ribbon because it was within reach and was black and then I slipped buttons over the ribbon to fancy it up a bit. So thankful for such a short name. It gave me extra room on the tile for decorations.

The sample tags below are all pins and were super super easy. The one on the right is just a bare tile that I stamped a flourish with Stazon and added some rhinestones. The one on the left used clear letter tiles that I colored with my copic markers. Yes I broke down and started another addiction. I purposely didn't want to start with these markers because I know myself better than anyone and sure enough- just a couple weren't enough.


I hope you all had a great Christmas. We had a nice quiet one here which is just what I needed. I have been feeling fine as far as my knee goes, but I have been having daily headaches since my surgery- I think it is just a coincidence . It is all sinus related and our weather has been crazy here in lower Michigan which has attributed to my misery. Physical therapy has helped me tremendously but with the holidays they have been closed and it has limited my days. I see the doctor tomorrow to get my return to work date.

Have fun and enjoy!

~Kim

Monday, December 21, 2009

Happy Holiday


I am usually more into the spirit of Christmas by now but the unexpected knee surgery sort of got in the way of that. I hadn't done much in the way of decorating the house and for those of you who know me you know that is hard to believe. My son is home from college and being the artist that he is, he was able to put a nice touch in helping his dad decorate the house.

I finally feel like I am back to the land of the living today. The pain in my knee wasn't anything compared to the side effects of the anesthesia. Today I was able to take a shower and take the bandages off. What a difference a shower can make.

Today's card is using the JustRite 2" round double border with a 15pt. New Time Roman font from The Stamp Castle. They are still having a sale and the new Square set is to die for.


The above picture shows the block set up with the font(oops, doesn't look like I cleaned my stamp very well). The way I find the center is to write out the sentiment on a piece of scrap paper. Then start crossing out letters from the out side in, including any spaces as if they were a letter. For example, with the Happy Holidays I would cross out the "H" and "s", then "a" and "y" until I got to the center. I didn't put any image in the center of the block because I wanted to use a snowflake. I stamped the font and then cut it out with my spellbinders nestabilities. I also used the scallop nestabilities as well as a circle punch for the snowflake. The fancy trim is one of the new deep edge punches from MS- Garden Trellis. The DS paper was last years Christmas paper from SU.


Hope you enjoy spending time with your families and all the holiday season has to offer.


Wednesday, December 16, 2009

Celebrate the season

How do you celebrate the season? When the kids were small we had a tradition of eggnog and Christmas music as we decorated the Christmas tree. We would spend one night riding around town looking at all the houses that were lit from top to bottom and then we would stop for hot chocolate somewhere. We would let the kids pick where they wanted go for the treat. I remember the year one of them picked McDonald's. It wouldn't have been my first choice of a Christmas memory but it was their choosing. I would spend two days making everyone's favorite cookies and fudge. Glad I was sane enough to have only three children. Christmas Eve we let them each open one present. They would spend the whole week trying to decide which package to open. Of course Santa's gifts weren't there yet so they would shake and rattle each present in hopes of making a good decision. And we always heard "this year why don't we open two presents". As they grow older I look forward to seeing which traditions they will carry on with their own children. I know we have given them plenty of wonderful memories that they will remember for years to come and that is just a fraction of the memories they have given me.

This card is one that didn't require much stamping. The paper is from Stampin' Up. The Christmas tree was in a package of 6 that I found in the tree trimming isle at Hobby Lobby- half off. The color was perfect for this paper. There were also red and cream trees in the package. The scallop border is a Martha Stewart snowflake punch.


I am having my arthroscopic knee surgery on Friday. I'm not sure how much I am going to feel like posting. I have some cards already made so you might just see some pictures without much to read. Then again what I post might not make any sense at all. I guess it depends how good the drugs are that they send me home with.
Have fun and enjoy!


Wednesday, December 9, 2009

New Stamps

I wanted to share with you today the new released JustRite stamps that I have been dying to show you. They are the Deluxe Round Monogram set and the Deluxe Square Monogram set both of which can be purchased at The Stamp Castle. Right now every thing is 20% off so there is no better time to buy them than right now. I guess it doesn't take a genius to tell which card is from which set. I do however want to tell you that each one comes with a different font but I used the Times New Roman font on both cards. If you have any questions about these stamps, or help in deciding which ones to purchase please send me an email.

The card above was a thank you card for a wonderful collection of Birthday goodies from my friend Carol. For her card I used DCWV La Creme with SU So Saffron and black. The background pattern was done using the Cuttlebug embossing folder Victoria. Nestabilities Labels Two made a nice backdrop for the monogram.


This card was also a thank you card for the hostess of our stamping group potluck we had last week. I didn't know her middle initial but since her first name was only three letters- I went with that. This card also shows some of the new Martha Stewart punches. I used the Daisy corner and edge punch to create the white scalloped square. I used a 3 1/4 x 3 1/4 square of paper so that the scallops came out even. I like the corner and edge combo but you do have to use specific size squares so they turn out. The other punch is the Deep Edge Garden Trellis. The background paper looks like I took a lot of time to create with white ink but in reality it is a recycled bag I had gotten from the hospital gift shop when I did a bit of shopping. The trim reminded me of winter so I thought it was perfect for this time of year.

It looks like I might be getting quite a bit of stamping done in a couple of weeks and will come back to this in a bit but I have a story to share. I have a friend who is having a knee replaced and it has been bothering her for quite some time. About 3 weeks ago my knee started to hurt but only when I stood up and started to walk. I thought it was maybe a bit of arthritis and it would ease up, only this seemed to continue to get worse. So much so that I had psyched my self up for a shot of cortisone. I told my friend that I was just having sympathy pains for her until a MRI said something different. Yep a torn medial meniscus. So it looks like I will be having arthroscopic surgery in the next week or two. Right now I am exhausted from putting up with the pain because I can only handle so many Motrin 800's a day. This whole thing has really caught me off guard. I didn't have this on my agenda for the month of December. Oh well, nobody ever said we control everything in our lives as much as we would like to try.

Have fun and enjoy!

Thursday, December 3, 2009

JOY.....

Putting a little joy into your life can do wonders for the soul. No that isn't a quote from someone famous, it's just something I believe in. Stamping certainly does that for me and I did a lot of stamping during the holiday weekend. I had the house to myself (which is another joy) and I just stamped until my heart was content. I found these poinsettias six to a package at Hobby Lobby. They were 50% so that brought them down to 16 cents each. Can't beat that when it comes to large embellishments. I did have to take a Copic marker to the yellow centers as they were too bright yellow for the vintage look of my card.

I am in love with the new Martha Stewart punches. The two that I used on this card are the jumbo ones which give a wider/deeper edge. They are perfect for scrapbooking if you punch the edges of larger paper, or they work just fine on a small card. The one I used on the olive green paper is Floral Vine and the other one is Doily Lace Trim.

I used Distress antique linen to vintage it up a bit. If you notice the labels four panels you might think there are three of them but there are really only two. The top white panel and tan are really just one. When I embossed it I left it in the die and sponged it with the distress ink. The die acts as a mask and voila! The sentiment is just a small 99 cent stamp. Brenda who runs the stamping department at Mary Maxim breaks up Hero are sets and then sell them separately. I love that because then I can just buy the ones I want.


Not much to report today. I have yet to start my Christmas cards. I hope to make them this weekend. We had a Christmas potluck get together last night with a group of us who get together once a month to stamp. We didn't do any stamping- we just sat around, laughed and ate. It was a really fun night. I brought the rice as part of the main course and there was plenty left over so tonight I made rice pudding. It is in the oven as we speak and I can't wait for it to be done. Nothing warms you up like a nice bowl of warm rice pudding with raisins and Grey's Anatomy.

Have fun and enjoy!

Saturday, November 28, 2009

A new kind of stamp..


I needed a sympathy card and I have been itching to use this set from JustRite stamps. It is the Thinking of You set and you can find it here at The Stamp Castle. As I mentioned in my last post, they are having a Black Friday Sale until midnight on the 30th so hurry on over. I stamped the sentiment and border in SU- Not Quite Navy and then went over the leaves with a Sakura gelly pen- clear star for a bit of bling. You can see it in more detail in the next photo. The birds were punched from a McGill Birds punch that has two different birds and a wing. Very fun to use. The background is one of my newer Cuttlebug embossing folders- Victoria. The paper is SU Not Quite Navy and the brushed gold is something I found in my scrap drawer. I also used my oval nesties a bit of more bling.


The picture below shows everything that comes in the set. You have to buy the wood block to mount them but you can reuse it for other sets that are the same size. This set uses the
2 1/4" x 3 1/16" oval block.

This is what the stamps look like. I had mentioned how versatile they are and this is why. See how you can interchange the border with any of the sentiments. You don't even have to use these sentiments. If you have one of the font sets you could make up your own.


All of the sentiments or images come as a complete oval as shown below but if you trim them as I did here you won't have to worry about getting ink smudges or edges when you stamp them. Believe me I highly recommend you trim them. Been there- done that!


This is a picture of what the block looks like and how you mount the stamps. You just push them into the grooves. I wish I had taken a picture of the back of the stamp so you could see what that looks like. The back of the stamp has ridges that fit into the block. It is actually is a tongue and groove system.


Below is a picture of the stamps in place and ready to be used. Don't worry you shouldn't end up with ink on the grooves unless you are using a pigment ink pad and you are pushing too hard into the pad. If that happens just use a Q-tip and clean it up.


I didn't do much shopping yesterday but I did a lot of stamping. I'll have several new cards to share with you soon but before I go I have to share with you a semi-disaster (ok maybe it wasn't a disaster because it worked out fine). I had made this card along with three others and I had them sitting on my desk, admiring them as I created more. When to my horrors I noticed this card laying face down on my light pink ink pad that I was using. Luckily it was only the upper left corner and I was able to wipe the ink off the dove. Since it was brushed metallic I think that's what saved me. I have a bad habit of not closing the lids on my pads as soon as I ink the stamp. I can't tell you how many times I have found a corner of my project brushed up against the ink pad. So ladies (and gents if there are any) make sure you keep you ink pad covered or at least at a safe distance from your project. Loreal can only cover so many gray hairs.

Have fun and enjoy!


~Kim

Wednesday, November 25, 2009

Happy Thanksgiving


Happy Thanksgiving. I can already smell the turkey and pumpkin pie. If I had to pick my favorite part of the dinner it would be the croutons that have fallen out of the turkey and have baked them selves to the bottom of the roaster. I only get to enjoy that if I am the hostess so I guess having to put on the big dinner is all worth it. Before I go any further I need to tell you about a Black Friday Sale. Go on over and check it out at The Stamp Castle. The new JustRite squares and circles are awesome. You can find them under the "new products", but the sale only lasts until midnight Monday the 30th. I can't wait to start creating my monogrammed Christmas gifts with them. Just think of the possibilities. If you haven't tried these JustRite stamps, now is the time. You will absolutely fall in love with them. The versatility is amazing. Saturday evening I will post something new that I have made with these stamps. Until then you can see a card I made with the Damask Borders and Times New Roman font set that was on my blog October 31st called Simply Black & White.

Now back to today's card. I layered a Nestabilities Label Four in SU Dusty Durango on top of So Saffron Nestie scalloped oval. Two small ovals fit perfectly which were stamped with the pumpkin stamp from a company called Great Impressions and the Give Thanks is a current hostess set from Stampin' Up (SU). I used Adirondack Terra Cotta ink. The designer paper is from The Paper Studio.

Happy shopping, have fun and enjoy!

~Kim

Saturday, November 21, 2009

Breaking it in...


I wanted to use my new Spellbinders Classic Lace Border so today I am breaking it in. I also didn't have the chance to use my new Spellbinders Fancy Tags until now. I just love this color combo of SU Always Artichoke and retired Cranberry Crisp. Any shade of Burgundy would work. I tend to use this combo in some fashion for my Christmas cards. Maybe I should throw caution to the wind and try to the new hot pink and green combo this year. I'll have to think about that one. The DSP is from Diane's Daughters products called Sandstone Floral. I also used my Nesties Label Four- my ultimate favorite if you haven't guessed that already. The sentiment sits on a small oval punch and modern label- both from Stampin' Up. The modern label punch is becoming one of my all time favorites. As always you can click on the picture for more detail.

Not much to talk about today. I have a very busy weekend planned. We have to dismantle our over the stove microwave that is being replaced with a new stainless steel one and this is the weekend the Christmas tree goes up. Some how I also have to find time to make a "thank you" card and a "welcome baby". I better put on the coffee pot and get crack'n.

If you remember the black and white monogram "C" thank you cards that I had posted on my blog a few weeks ago; I have a great place for you to buy the monogram stamp sets 25% off. It is called The Stamp Castle but hurry because I don't think the sale is going to last much longer.

I hope to have a Thanksgiving card posted by Wednesday but if I don't, I wish you and your families a warm cozy day filled with laughter and good food.

Have fun and enjoy!

~Kim

Wednesday, November 11, 2009

Create Joy...

As I mentioned in my last post, I was taking a road trip with a few of my stamping buddies for some well deserved shopping. With coupons in hand we headed out to our favorite stores and a few new ones. Being the professional shoppers that we are, there wasn't one store that we didn't have a coupon (or two) for. We couldn't have saved more money unless we had stayed home. Today's card was made using some of my fabulous finds. Michaels had MS punches on sale and they had quite a few of her new ones.

I used the MS daisy border punch on this card. I didn't purchase the corner punch to go with it because I wanted too many border punches instead. You can also purchase the matching borders and corners as a set but they are pretty pricey. I also saw that MS has come out with punches that are also a stamp. That Martha- she must have come up with a lot of ideas while she was on her "sabbatical" a few years ago. Anyway back to the card. I found the vine ribbon for a dollar and the rhinestones are by Prima all from Michaels. The rhinestones on the daisy border are actually light peach color not clear. The sentiment is from Hero Arts. Don't you just love how the citrine rhinestone fit right in the "O" of Joy.

We headed over to Archivers where I got the dark chocolate card stock with my five free sheets- coupon. I know, I know- I feel the guilt of using any other card stock other than Stampin' Up but it was freeeee. I did use Stampin' Up's "so safron" and the DS paper is BasicGrey. The scallop ovals are just McGill punches. The luscious chocolate panel was run through my Cuttlebug using the Victoria embossing folder.

I really like the sentiment I used today because it not only is saying to create joy for others but you have to create joy for yourself. Don't wait or depend on others to design your life for you. You need- to live your life. We are the creators of our own destiny.


I wanted to include this picture because it reminded me of "Twilight"- sort of spooky and ghostly. I was taking pictures this weekend and it was a really foggy morning. As the sun started to come up, the woods behind our house got really creepy. I was hoping against all hope that Edward would come walking out but no such luck.

Enjoy and have fun!

~Kim

Friday, November 6, 2009

My favorite season


This is a little project that was in the works but I hadn't gotten around to finishing it. I figured I better get going before I had to change the letters to S-N-O-W. I love the smell and crispness of Fall and it is my favorite season. I rememer spending hours playing in the leaves as a child. I grew up in the UP and the color of fall is like nothing you have ever seen. True God's country at a slower pace.

I pulled this out of my stash that had come from a dollar bin and the letters were just plain cardboard. The "F" and first "L" were covered with the Paper Studio ds paper. The "A" is from Diane's Daughters and the last "L" was covered in Bo-Bunny. I added some embelishments to each letter and you can get a closer look by clicking on the picture.

Trying to stay awake past 9 o'clock these days. I do much better with the time change in the fall than I do in the spring but I have the hardest time between 8 and 9 in the evening. I can hardly wait to crawl into bed. I seem to get my second wind around 9:15 and then I'm good until 11. So bare with me if I seem to ramble. I have at least another hour before I am good to go.

A few of my stamping buddies are taking a road trip with me this weekend for some well deserved shopping. There are several stamping stores we have on our list of places to stop and we have coupons galore. Watch out- here we come! The ride should be just as fun. I really enjoy spending time with these girls and we always have more than a few good laughs when we get together.

I think that will be all for tonight. If I don't get off the computer I'm going to end up with keyboard keys imprinted on my forehead. It has been a long week.
Have fun and enjoy!

~Kim


Saturday, October 31, 2009

Simply black & white

I absolutely love the JustRite products. The monogram is from one of their DYI kits Times New Roman font with Damask borders. This set has three different borders and 90 pt. font all in capitals. The letters fit in the center of the borders so you don't have to worry about not getting the letters centered. They do have other sets that allow for three initials and you can make the most beautiful gifts with their products. I am expecting an order any day now that has a new font set and circular block that will allow me to create my own sentiments to go around the outside with an image in the center. You may just see some cards with "Merry Christmas from the Chaltry's"

I made 10 of these thank you cards for boss's day a few weeks ago. They looked beautiful in a cellophane bag tied with black satin ribbon. I used the Swiss dot Cuttlebug folder, scallop circle Nestabilities and SU modern label and word window punches. I wanted the design to be simple yet elegant and I love how they turned out.

Elliot is staying at school for Halloween and even though it is just my husband and I, we still decorate the house. This is his favorite holiday and he loves to go all out. He carved the pumpkins last night and I took care of washing the seeds and baking them. It is a nice holiday treat when they come out of the oven all salty and warm. I still have a lot to do to get ready for the little ghosts and goblins that will be showing up soon. We hand out mini individual bags of microwave popcorn that comes in Halloween designed bags. That way if we have leftovers I don't feel so bad eating the popcorn instead of candy bars. We get cases that contain 40- bags from Sam's Club and the kids seem to like them. I'm sure their parents appreciate it just as much.

I spent the morning taking pictures of the birds that came to the crab apple trees just off our deck. I got some great pictures of a male and female cardinal that I will share with you in another post.

Take care and enjoy!

~Kim

Saturday, October 24, 2009

Pretty and Organized


Here is a picture of how I store what I call my "pretty things". Since I ran out of storage space in the walk in closet, I had to turn to storing things on shelves. If it is going to be out in the open and I have to look at it I wanted it to be appealing. The ribbon jars are not new. I just moved some of them onto this wall. The tin pails on the upper shelf are what hold all of my alphabet chip board letters. I do have one more small shelf that is being painted and will go under the canister shelf. I have eight small candy jars just like the ones I store my ribbon in, but they will hold all my buttons by color. Below are some close-up pictures.


This is what I have been doing the last few weeks. I think I mentioned that my neighbor who is a drug representative had given me some canisters that he can no longer supply to physician offices. I covered them with ds paper- My Mind's Eye- Out & About Blue Paisley and used MS scallop doily border punch, EK Success Fleur de Lis border punch and nestabilities labels four. As you can see by the labels I store all of my chip board shapes in them. I separated them by glittered and shapes. I printed the words on the computer and then used the nestabilites which made it very easy to center them. I chose not to layer the smaller canister labels with the SU-Baja Breeze card stock for two reasons. One I would have had to layer it on a white layer so it would show up against the printed paper and two, it then became so large that it covered up most of the ds paper and up into the border. The lids are clear acrylic with just the silver metal handle. I just love how they turned out.


Her are the tin pails that I store the chipboard letters in. I had gotten them from Target awhile back in the dollar section. Like everyone else, I love that section and always find some great things to alter or use. I found some light teal clear plastic plates in the end of summer clearance isle at Walmart and although you cant see them, I painted little wooden knobs white and glued them on top in the center of the plate. I wanted something that could keep the dust out, yet was easily accessible. I divided the alphabet up into six sections because that is how many pails I had and the number that would fit on the size of shelf I had. One set of white alphabet stickers did the job, teal rhinestones and a few foam glitter butterfly stickers added some bling. The ribbon was also added for some color. This shelf is very high up and I can just reach the bottom of the pail with my fingertips. That's not saying much since I am only 5'3''. The next picture shows a close-up.


This next picture is of the section to the left of my storage shelves. The cherry cabinet is the one that impressed Elliot so much and stores all my jars and containers of flowers. I stacked some of my Sizzix dies that I use the most on top. The boxes aren't full but one of them holds my Sizzix embossing plates and Sizzlets. You can see my old Sizzix on the table below which I very seldom use any more now that I have a Big Shot. The boxed frames to the left were hand-me-downs. They were worth their weight in gold to me as they can hold quite a bit in such a small area. They fit perfectly behind the door as you come into the room and look- the bottom one is still empty. I'll have to remedy that.


I hope you get some organization tips from my post today. I know how much I enjoy a peak into other stampers rooms. I don't know if I dare show you the other side of the room. It is very well organized and every thing has it's place, but when I looked at the pictures it looks very overwhelming and busy. Maybe I'll post them at a later date.

Have fun and enjoy!

~Kim


Saturday, October 17, 2009

A bit of halloween...

This one is for you Pam!

I was working on these tags at one of our stamp clubs and I was asked what I was going to do with them. I told them that I was going to use them on the front of my Halloween cards. That was a few weeks ago and last night at another stamp club that I belong to with Pam, she asked when I was going to be posting the cards I had made with the tags. So in her anticipation I have decided to post them today. I hope you like them Pam.

I tried to keep the color pallet the same since the tags were all very similar. It also makes for a very nice photo shoot. I decided to set up my shoot with some props that adds a bit more color than just the blank white canvas. All but two of the snickers made it back into the bag. Not bad I say! I made my own canvas out of foam board and paper. You don't see the edge anymore where the back meets the bottom. I got the idea from Gina K Designs Stamp TV. She has an online magazine called Stamping lifestyle.

I think the "spooky" card is my favorite. It was a last minute decision to add the black pearls in the O's to look like eyes and I used the Martha Stewart- Drippy Doo boarder punch. The "Boo" card I used the spiderweb cuttlebug folder and then rubbed my Ranger "black soot" distressed ink pad over the top to make it pop. The letters were cut from my Sizzix script alphabet set. All of the tags were distressed with Ranger vintage photo distressed ink. I don't remember where I got the glitter foam sticker bats from- maybe Walmart. I have them all cut apart and stored in an embellishment container. There were three sizes on one sheet and I would say about 12 -15 of them per package.


Now everyone can run out and buy themselves a snicker bar or two (if they are the snack size) you deserve it. Don't forget to pick up a stamp or embellishment while you are out. I would hate to see anyone waste a trip to the store with out adding to our other addiction- hoarding. You know how it is. We may not use it- but we just have to have it.

My good friend Carol is back in Florida and she said it is so hot that they haven't been able to do much outside. For all us poor northerners, isn't it nice to know at least someone is warm. I expected to see snow flurries when I got up this morning but was happily pleased to see that the weatherman was wrong again. I'm sure it's not far off. Looks like a good day to just spend in my studio.

***Oh by the way, how do you like the NEW LOOK of my blog. I have been playing around editing the HTLM template. I was able to change the colors and the font of Dragonfly Dreams. I couldn't hold my breathe any longer waiting for Elliot. There is a designer that I have contacted that can custom design the look so it is a little fancier. You may see even a bigger change in the next month or so.


Have fun and enjoy!

~Kim


paper: SU- black, dusty durango, marigold morning (old color)
stamps: Inkadinkado-scary night, Sizzic clear stamps- happy halloween by Brenda Pinnick
ink: Ranger distressed- black soot & vintage photo, SU black
punches: Martha Stewart drippy doo boarder, SU- modern label & ticket punch, Sizzix- script
alphabet set, EK Success swirl fourish
tools: Spellbinders- label four nestabilities, Cuttlebug folders- spiderweb, skulls


Saturday, October 10, 2009

Through the window, what do I see


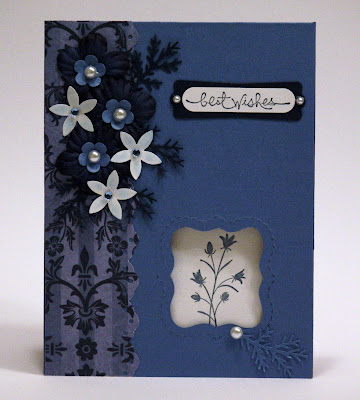
I wanted to share with you today the card I made with my Sizzix Movers and Shapers. Not so sure I would spend the money on this product. I got it very cheap so I thought I would give it a try. I have the curly label punch from SU and I think I could make the same card with just that. Unless you want the window in the center of the card any punch around the edge would give you the same result. I did like the perforated line about the label that the Movers and Shapers creates. The window that gets punched out is slightly larger than the curly label punch so it makes a nice layer. Save those scraps.

For my sentiment I used the Word Window punch and the SU "short and sweet" stamp set. I layered it with the new punch from SU called Modern Label. I then added a small pearl at each end. The card stock that I used was SU Ballet Blue and Night of Navy for the accents. The navy flowers were just some satin flowers that I put a center in using the SU Trio Flower punch and a small pearl. The white flowers were punched from an old SU punch called Spring Flower Bouquet but you could easily use any small flower punch. Because the stark white flowers were so prominent I brushed a bit of blue chalk on them to tone them down. I tucked the sprig branches punched from a Martha Stewart punch in among the flowers for more texture. Although I want to show you the detail of the flowers in the closeup, the sticky glue of the embellishments tends to really get enhanced also. Oh well- in life we have to remember to take the bad with the good. The image that I stamped on the inside of the card that shows through the window is from the SU "pocket silhouettes" set.

I am still organizing in my studio. Once I got started I couldn't stop. Elliot was home for a dentist appointment and came into my studio while I was creating. He commented how much he liked the new look. He was really liking the cabinet I put on the wall that holds all of my flower embellishments. He thought it was very cool that you could just see some color through the frosted ribbed glass door. He told me that on his drive from school he was wondering how I manage to come up with so many ideas for cards. See, he does still think of me even when he is away at school. I guess he still loves his old mom. When I hugged him he seemed even taller and of course he said I seemed even shorter. He looked good for being on his own for six weeks. A lot of PB & J he said. I don't know what I was expecting. I guess every mom wants to know that their children still need them but to see he can make it on his own (not financially yet of course) is very gratifying. I guess we did a good job in raising him.

Have fun and enjoy!

~Kim

Saturday, October 3, 2009

Simple but Elegant


It was a rainy dreary day here today. The sun had been trying it's hardest to warm up the afternoon but the clouds continued to roll in. There were a few times that the rain was pouring down in the sunshine. It actually looked beautiful as the raindrops hit the sunlit leaves. Looks like t will be the same all over again tomorrow. Now if we could have a little thunder with that, I would be all set. There is a full moon shining right now and not more than 5 minutes ago there was a downpour. Our weather certainly has been changing.

Today's card is all about the nesties. I used my new Classic Frame and Labels Four from Spellbinders. I call it simple but elegant. The designer paper is from My Mind's Eye- Laundry Line. I just love this embossed glitter paper. Again this card was going in the mail so I had to keep the embellishments to a minimum. The card stock is from Stampin' Up of course which I use 95% of the time for my cards. I love the weight and the selection of colors. I have all the inks to match and the two compliment each other for a beautiful end result.

I am still doing a bit of organizing in my stamping room. I am looking for DVD brackets that can be mounted to hold my Stampin' Up ink pads. They are strips that hold 16 each. I saw a picture on someones blog and she said she got them a few years ago at IKEA. I have sent them an email but haven't heard anything back yet. I am also waiting for a rolling storage cart with six shallow drawers to go on sale at Staples. I want to keep my scraps according to color in separate drawers and since it will only hold scraps, I don't want to spend a lot of $$ on it. I had all the scraps in a basket on my desk but I wanted to make room for some type of rotating ink storage. If I can't find the brackets to make my own, I may have to go with the one from Stampin' Up with the extender. The problem is you can't add more than one extender and I need it to hold a few more pads. We will have to see what I come up with.

Have fun and enjoy!

~Kim


Sunday, September 27, 2009

Happy Birthday- Girls


Just a quick post tonight to show you something new. I have two very special friends that I have known since high school and we are all named Kim. Their birthday's are just a day apart and they don't know it but they both got the same card. They live miles apart and will never know unless they read my blog. Happy Birthday Girls! I am so glad they are older than me by a whooping 2 months.

I have been busy most of the weekend reorganizing things in my stamping studio. It was getting that cluttered look so it was time to do something about it. I painted two shelves earlier in the week so they were ready to be put up. I also had some smaller framed cubes that go on the wall and I mounted the four of them vertically. This way I can store things inside and on top of each one. I also found a great buy on a wall cabinet that has shelves and a frosted glass door- Just love it. I now store all of my flowers in it which made room in a different hutch for the new paper I had purchased and had a pile here and there. I also had six small silver metal pails that I had gotten from Target and I tied turquoise ribbon at the top. I put white alphabet stickers on the front to represent the chipboard letters that are in that pail. I divided the alphabet up into six so there are four to five letters on each pail. I think this will work great when I am looking for a letter I can just grab that pail and see which one matches best. I will post pictures in a later post.

For the card I used DCWV-La Creme and my spellbinders label four. I also used my new Latice borderabilities with a few pearls to dress it up. I had to keep it toned down a bit since it had to go in the mail. Really kills me to do that. The ribbon is a perfect match that I found in the dollar bin at "M" quite awhile ago.

Back to the birthday girls. I do have to tell you a funny story about all three of us being named Kim. When we were in high school we were walking down town one night (a very small town and at the time we didn't even have a stop light) a car full of boys from a neighboring town and different school pulled up along side us and asked which one of us was named Kim. Of course we just started laughing as we were looking at each other. We later found out that these boys knew exactly who we were and that we were all named Kim. Oh what memories and simple times of fun.

Have fun and enjoy!

~Kim


Saturday, September 19, 2009

A long awaited project


I wanted to share with you today a very special project that I just finished. This is a date book for birthdays and anniversaries. I took this class at The Owl and the Pussy Cat in Fort Myers, Florida when I was down visiting my friend Carol. It is fabric covered book and it does take a bit of time and some concentration when putting it together. Here are a few more pictures.


The Front Cover


This is the inside cover. You can see the title of the book and the tabs that indicate the months. I used VersaMagic - sugarcane on the image at the bottom. I wanted to keep it subtle. The paper I used to line the inside cover is a textured Japanese paper from the Owl and the Pussy Cat. It is very durable and will hold up better than ordinary card stock. It comes in many different colors that would match any material you might choose. After I had finished the book, I wished I had thought to put the ribbon under the Japanese paper for a cleaner look. Lesson learned for my next one. At the Owl and the Pussy Cat they also sell packages of the pre-printed inside pages that contain a full year. All you have to do is cut them in half and round the corners if that is the look you want.


Each month has two pages of regular card stock with the appropriate number of days. I just have to write the names next to the date for an easy quick glance at the special days. I used my Hero Arts -Fantastic Flourishes stamp set in SU mellow moss ink at the bottom to add a little flair. The tabs were created using a SU- Round Tab punch.


In between each of the months I added a blank page to write gift ideas that I might come up with long before the date, or hobbies of the receiver that might help me with ideas in my purchases when the time comes.

The back cover is the same material as the front. These are actually upholstery samples that is plenty large enough for the front and back cover. This book measures 5x11 and I did trim down the inside pages about a quarter of an inch so the edges were protected by the edges of the cover. I used red tacky tape to hold down the fabric onto pieces of sturdy mat board and also to adhere the Japanese paper. It is very important that you spend the money on a good product that will hold. After you put this much work into a book like this, you don't want it falling apart. Since I wanted rounded corners I had to spend a bit more time covering the corners with the fabric. I cut small slits and pinched and pleated the corners until they looked professional. Takes a bit of practice and patience. I used my Zutter on the covers once they were covered which brings about another little issue depending on the type of fabric you use. This one tended to fray quite a bit so once I cut the binding holes I had quite a bit of threads sticking out the holes. To clean this up, I took a very small pair of scissors and tediously trimmed inside each one. I then put a drop of Fray Check around each hole. At first I thought I may have ruined the fabric as it left a darker liquid mark, but the Fray check dried and you couldn't even tell I had used it.

I wanted to use the window plate that is in the bottom right corner but I didn't know what to put in it. I then decided on my initials but I didn't have a "k" and "m" in a lower case font that I liked so I just made the "C" in a different font. I had completely forgot about my Justright stamps until after the book was complete.

I hope you enjoyed my project. This book can be tailored to whatever type of book you want and the size and look are endless. These books make great gifts so in my mind it justifies the cost of the Zutter.

Have fun and enjoy!

~Kim